
It's a true honor to join mosaic bricks. The growth of mosaics throughout the Lego years, has constantly been inspiring and a joy to watch. We are often applying much of what we've learned here at this site and hope to join in contributing in the future. For starters, we'd like to share with you one of our most recent mosaics, in a long and potentially boring form... But hope you like it! ;)
The holographic mosaic concept first came to Steph and I when looking at the many shades of trans-blue studs that can be found on Lego’s pick a brick wall. Though we most often use these pieces for water, the thought crossed our minds to make a holographic Cortana from the Halo video game series. Initial ideas ranged from sculpting a lamp-like inner lit sculpture, to a back lit mosaic. After some interesting discoveries we decided to go with a mosaic. And we'd like to share some of these discoveries with you!
The initial concept is simple. Just like stained glass, we wanted to create an image where the light was coming from within, or in reality behind. So using thousands of trans clear, trans light blue, and trans dark blue 1x1’s, we built her image in a series of tall 1x1 stacked towers with differing combinations of these parts.
There are several things we want to point out for anyone out there looking to either learn more about this moc, or wishing to create other holographic mosaics of their own.
Rows vs Columns: The first consideration is that there are two ways to orient the tall stacks of 1x1 plates. You can either have them as the columns or rows in your final mosaic. There are benefits and costs to doing each. If you have them as horizontal rows you are impeded by gravity as to how wide you can make your mosaic before the rows sag and break whilst spinning. However doing them in this horizontal fashion also allows you to have vertical pixels. You can see we chose to assemble Cortana with horizontal rows as taller pixels will make her image appear leaner and thinner in appearance. If you orient the stacks as columns in your piece, then your horizontal lines will be smoother rather than your vertical lines, but you also get the added benefit of having a much stronger mosaic without the size limitations. As Cortana is a skin tight holographic woman, we chose to use vertical pixels with horizontal rows.
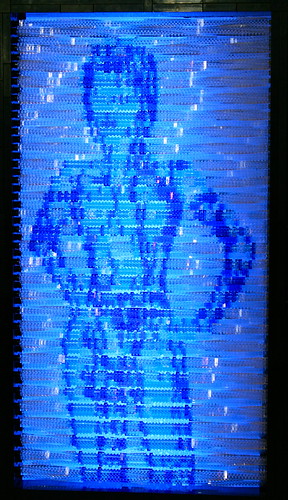
Computer program: Rather than using computer programs to tell us which color pieces to place where, we simply eyeballed it by holding rows up to a monitor, and taping framing guides directly on the screen with blue tape. This was done because some parts like the 1x1 round plates let light through in the corners and should often be used specifically depending on where you want pure flecks of light to shine through without passing through the plastic. Here is a photo of the mosaic before any of the effects are used.

Casting the Light: In order to get the shimmering effect as well as the effect of the spiraling lines crisscrossing each other you twist each individual piece in the smallest increment to give each square column a helix twist. This reflects the light back at you at controlled times. For a smooth transition from right to left, you would use this helix. For Cortana the twist for each row is 270 degrees, as well as lining the glimmers up from row to row. The speed of your motor, as well as the rotation of your twist will effect how fast the light glimmers across your mosaic. The slower the turning speed and helix twist the slower the shimmer effect. Also because of how the gears rotate in opposite directions when connected in series, we found it best to curve every other helix in the opposite direction to add an additional effect of having the dark edge lines scissor towards each other from row to row.
Fluctuating Vertical Pixels: Once you've got your horizontal or vertical rows of helixes placing them is important. Because they can't remain side by side like the original mosaic, first we have to compensate for the fact that, once twisted, the rows can’t sit tight together. We compensate for that by having every other row set back. This allows the corners of each brick to rotate freely without bumping into the row beside them. This also does another thing. As the pixels rotate each pixel flexes from either being 1 brick tall to being 1.41 bricks tall on account of the length of the diagonal. This however is only true for the front rows, as the back rows flex between being at most 1 brick tall to .59 bricks tall on account of being overlapped by the front rows.
Series Gears and Motor: This is self explanatory, but below you can see a photo of the gears in series. To avoid taxing a single motor too much we had to use two, with one at the beginning and one in the middle. Play around with this before mounting any rows or columns. Also you will find that the gears only really work in turning the first row in one direction if you use the simple technic brick offset as shown in the photo. Simple, but you want to keep this in mind for which row your motors are mounted.

Lastly, some other fun additions we would encourage are back lighting and a dimmer switch! The lighting adds a lot to both color and the grab of the mosaic, and the dimmer switch is immensely useful and fun to be able to control the speed of rotation, as well as to spot problems, and start and stop without having to jerk to a stop. And there you have it. Hope you've enjoyed and perhaps want to make a version of your own!
Thanks so much for reading!
-S&C
Awesome! I'm so glad you posted this. I was coming downstairs to do it, but it's better that you have. Yay! Welcome!
ReplyDeleteGreat work!
ReplyDeleteWow that's just ridiculous
ReplyDelete